With KITCHENAID MIXER CARE AND MAINTENANCE, your mixer will last forever. These tips will fix any small problems you might be having!

I received my KitchenAid Stand Mixer as a wedding gift 15 years ago and it still works like I just pulled it out of the box. It’s about the only appliance that I use regularly and have not had to replace. To keep your KitchenAid in top working order, it’s important to take care of it and regularly check to see if you need to make a few tweaks to maintain it properly.
Cleaning your KitchenAid Mixer
The simplest thing to clean your KitchenAid mixer with is warm soap and water. Remove any attachments and make sure to clean the spring and pin your attachments go on. These can get clogged with food especially if you’ve started the machine on a high setting and splattered your batter. If you find you are having a hard time putting on attachments then you need to put a little oil on the spring and pin, move the spring up and down a few times and you are good to go.
Care for KitchenAid Attachments
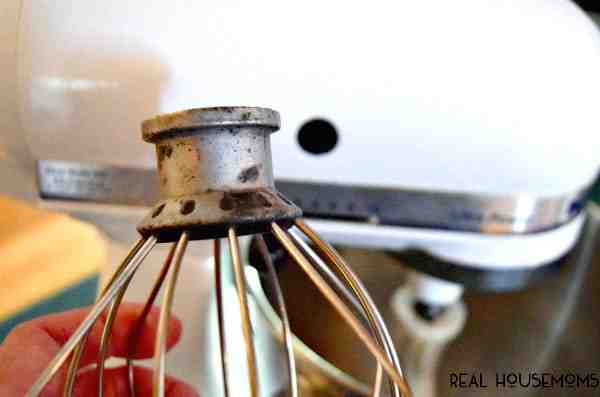
Some of your attachments are coated and are fine to be put in the dishwasher these are white like the flat beater and dough hook. Unless you purchased a stainless steel whisk with the bowl-lift mixer then you will need to handwash your wire whip by hand or they will end up like this and you will get yucky black stuff all over the place. Yes, I speak from experience as you can see. These attachments are made from aluminum and washing them in the dishwasher causes oxidation which is that nasty black stuff.
If you have mistakenly washed your wire whip or other uncoated attachments and they are getting black stuff everywhere there is a fix for this! Put your attachment in a pot and add 2 cups of vinegar. Put in enough water to cover the neck of the attachment and boil it for 20 minutes.
Wipe it down with a clean dry rag to get more of the black stuff off and if you still have a bit then repeat the process. Mine was really oxidized and I could not get it all off but it looks way better than it did and now I don’t get black stuff on me or in my food.
How to Adjust the Beater on Your KitchenAid Mixer
When you first buy your mixer the beater is preset to just clear the bowl. But after some use, you may find it needs an adjustment. To test your beater to bowl clearance, KitchenAid recommends putting a dime in the bottom of the bowl. turn on the flat beater and if it doesn’t move the dime at all you need to lower it. If the dime moves around the bowl a little at a time you are fine. It’s just one little screw you need to mess with and is easy peasy! When properly adjusted, the flat beater will not strike on the bottom or side of the bowl.
Unplug stand mixer ( I know your thinking really she just had to tell us that!). Bowl-Lift Mixers – Place bowl lift handle in the down position, or for lift-top mixers lift-back the motorhead. Attach flat beater and close top to see if it needs to be moved up or down Locate the screw on the neck of the mixer as seen in the picture below for your tilt-head mixer and adjust it so the flat beater just clears the bottom surface of the bowl.
Turn the screw counterclockwise to raise the bowl and clockwise to lower the bowl. Just a slight turn is all that is required: the screw will not rotate more than 1 ⁄4 turn (90 degrees) in either direction. (The full range of adjustment is one half turn or 180 degrees.) If you have a bowl-lift mixer you will find this screw where the head meets the neck of the mixer. To check Place bowl lift handle in up position or lower the motor head to check clearance. Repeat steps 4 and 5 if necessary.
If you are more of a visual learner like me here are videos to show you.
Fix a Tilt-head KitchenAid Mixer that Wiggles
After prolonged use you may find the head on your tilt-head mixer starts to wiggle. You just need to tighten the hinge pin and here is a video to show you just how to do it.
I hope these tips will help you keep your KitchenAid Mixer in tip top shape, and you can get your attachments organized with our DIY Stand Mixer Attachments Organizer . Then, see how to shred chicken the easy way for shredded chicken in seconds and make some of my favorite desserts with it!
